 Save
Save My upstairs neighbor knocked on my door one Saturday holding a plate of warm, golden rolls that smelled like a pizzeria. She called them her secret weapon for game day, and after one bite I understood why her guests never left early. The dough was soft but sturdy, the filling rich and meaty, and somehow they didn't sit heavy like I expected. I asked for the recipe immediately, and she laughed and said it was just yogurt and flour. I didn't believe her until I made them myself the next week.
I started making these every Sunday after my morning workout, and my roommate would wander into the kitchen following the smell of browning cheese and garlic. We'd sit on the counter eating them straight off the baking sheet, still too hot, laughing about how we couldn't wait. They became our unofficial tradition, and even now when I pull them from the oven, I think of those lazy weekend mornings. There's something about food that marks time better than any calendar.
Ingredients
- Plain Greek yogurt: This is the magic that makes the dough soft and tangy while sneaking in extra protein, and nonfat or low fat works perfectly without sacrificing texture.
- Self-rising flour: It gives the dough lift and structure without yeast, and if you don't have it on hand, the all-purpose substitute in the notes works just as well.
- Egg: Adds richness and helps bind everything into a smooth, rollable dough that won't fall apart when you slice it.
- Garlic powder and salt: These season the dough itself so every bite has flavor, not just the filling.
- Lean ground beef: Keeps the protein high and the fat low, and browning it first ensures no sogginess in the rolls.
- Turkey or beef pepperoni: Delivers that classic pizza punch with less grease than traditional pepperoni, and the slices distribute evenly through each roll.
- Shredded part-skim mozzarella: Melts beautifully and stretches when you pull the rolls apart, giving you that satisfying cheese pull.
- Pizza sauce: Keeps the filling moist and adds a tangy tomato base that ties everything together.
- Italian herbs and black pepper: Simple seasonings that make the beef taste like real pizza topping, not just plain meat.
- Crushed red pepper flakes: Optional but worth it if you like a little heat sneaking up on you.
- Olive oil: Brushed on top, it helps the rolls turn golden and crisp on the edges.
- Grated Parmesan and dried parsley: The final touch that makes them look bakery-worthy and taste even better.
Tired of Takeout? 🥡
Get 10 meals you can make faster than delivery arrives. Seriously.
One email. No spam. Unsubscribe anytime.
Instructions
- Preheat and Prep:
- Set your oven to 400°F and line a baking sheet with parchment so nothing sticks. This step seems small, but it saves you from scraping cheese off the pan later.
- Brown the Beef:
- Cook the ground beef in a nonstick skillet over medium heat, breaking it into crumbles as it browns, about 4 to 5 minutes. Stir in black pepper and Italian herbs, then let it cool slightly so it doesn't melt the dough when you roll.
- Make the Dough:
- Mix Greek yogurt, self-rising flour, egg, garlic powder, and salt in a large bowl until it comes together into a sticky mass. Turn it onto a floured surface and knead for 2 to 3 minutes until it feels smooth and cooperative.
- Roll It Out:
- Roll the dough into a rectangle about 12 by 10 inches, dusting with a little extra flour if it sticks. The shape doesn't have to be perfect, just roughly rectangular so the rolls come out even.
- Spread the Sauce:
- Spread pizza sauce evenly over the dough, leaving a half-inch border all around. This border keeps the filling from oozing out when you roll and slice.
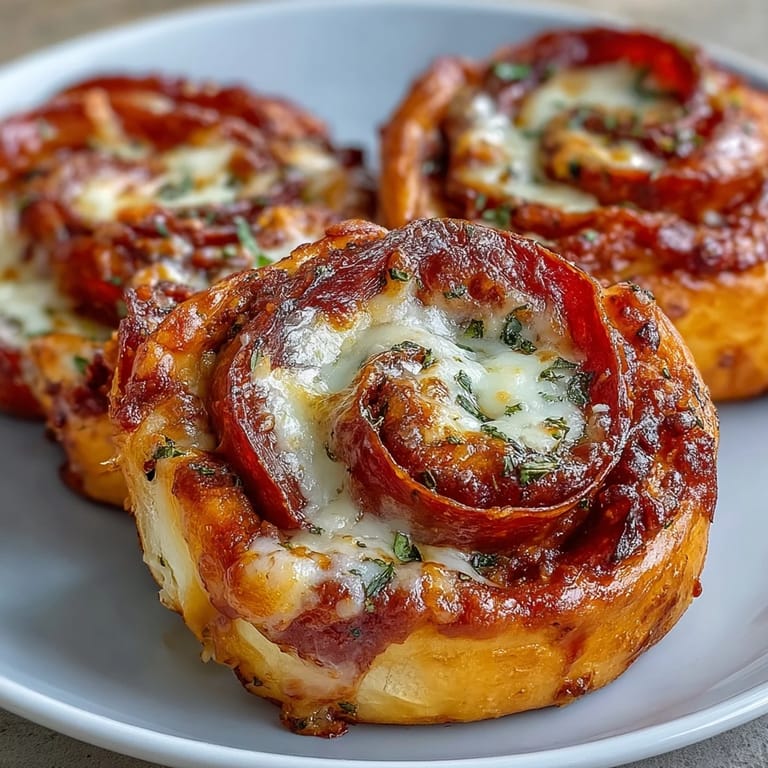
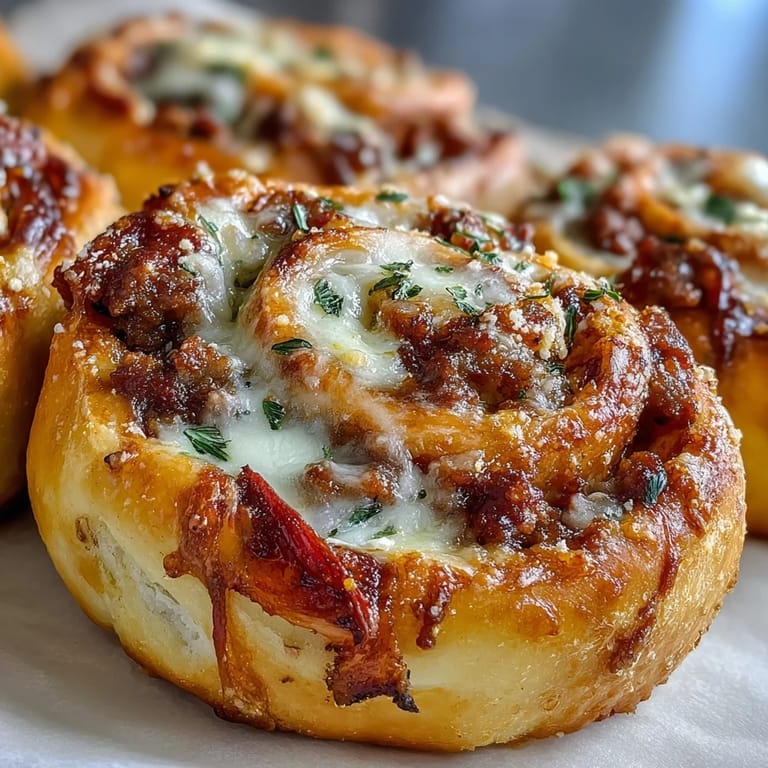
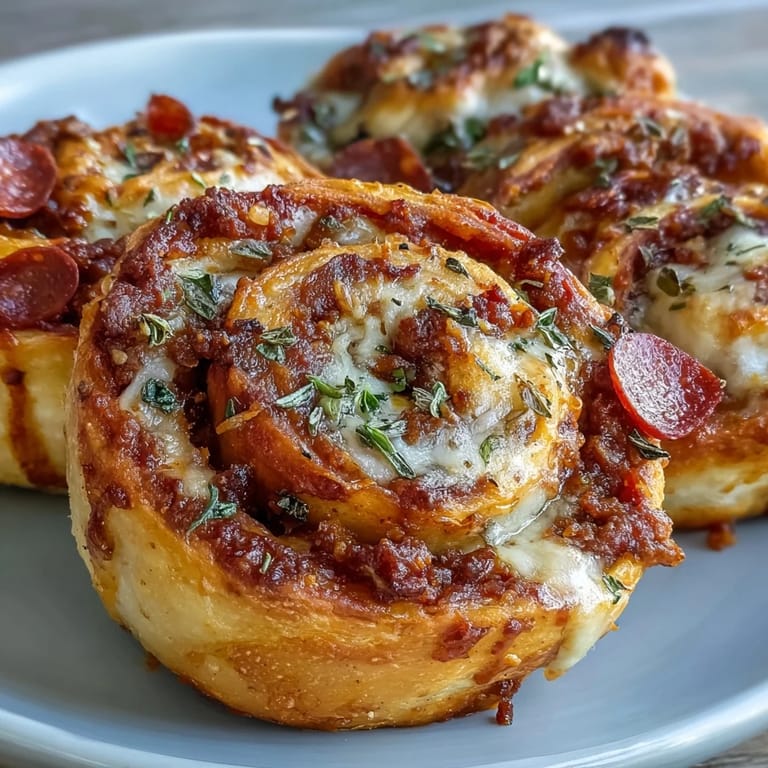
- Add the Filling:
- Scatter the cooked beef, pepperoni slices, and mozzarella evenly over the sauce. Try to distribute everything so each roll gets a fair share of toppings.
- Roll and Slice:
- Starting from a long edge, roll the dough tightly into a log, then slice it into 12 equal pieces with a sharp knife. If the knife sticks, wipe it between cuts.
- Arrange and Top:
- Place the rolls cut-side up on your prepared baking sheet, brush the tops with olive oil, and sprinkle with Parmesan and parsley. This is what gives them that golden, herby crust.
- Bake:
- Bake for 18 to 22 minutes, until the rolls are golden brown and the cheese is bubbling out in little pockets. Your kitchen will smell like a pizza shop.
- Cool Slightly:
- Let them sit for a few minutes before serving so you don't burn your mouth on molten cheese. Trust me, waiting is hard but worth it.
 Save
Save I brought a batch to a potluck once, still warm in a foil-lined basket, and they disappeared before the main dishes even came out. Someone asked if I'd ordered them from a bakery, and I just smiled and said they were easier to make than boxed mac and cheese. That night, three people texted me for the recipe, and I realized these little rolls had become my signature without me even trying. Food has a way of doing that, turning a simple idea into something people remember you by.
Making Them Your Own
You can swap the ground beef for turkey or chicken if you want to keep it leaner, or even skip the meat entirely and load up on veggies like bell peppers, spinach, or mushrooms. I've tried adding a handful of chopped olives and a sprinkle of feta for a Mediterranean twist, and it worked beautifully. The dough is forgiving, so treat the filling like a canvas and use whatever sounds good to you. Just keep the wet ingredients balanced so the rolls don't get soggy.
Storing and Reheating
These rolls keep in the fridge for up to four days in an airtight container, and they reheat perfectly in a 350°F oven for about 8 minutes. If you want to freeze them, let them cool completely, wrap individually in plastic, and stack them in a freezer bag. When you're ready to eat, bake from frozen at 350°F for 10 to 12 minutes, and they taste just as good as fresh. I keep a stash in the freezer for those nights when cooking feels impossible.
Serving Suggestions
I like to serve these with a side of marinara for dipping, or a simple green salad dressed with lemon and olive oil to balance the richness. They're sturdy enough to pack in lunchboxes, and kids love them because they're handheld and fun. Sometimes I'll make a double batch and serve them as appetizers at parties, and they always vanish first.
- Pair with a crisp Caesar salad or roasted veggies for a complete meal.
- Serve with extra pizza sauce, ranch, or garlic butter for dipping.
- Pack them cold for lunch and eat at room temperature, they're still delicious.
 Save
Save These pizza rolls have earned their spot in my weekly rotation, and I hope they do the same for you. There's something deeply satisfying about pulling a tray of golden, cheesy spirals from the oven and knowing you made them from scratch in less than an hour.
Cooking Questions & Answers
- → Can I use regular flour instead of self-rising flour?
Yes, you can make your own self-rising flour substitute by combining 2 cups of all-purpose flour with 3 teaspoons of baking powder and 1/2 teaspoon of salt. Mix thoroughly before adding to the yogurt mixture.
- → How long do these rolls stay fresh?
Store baked rolls in an airtight container in the refrigerator for up to 4 days. They reheat beautifully in the microwave for 30-45 seconds or in a 350°F oven for 5-8 minutes until warmed through.
- → Can I freeze these rolls before or after baking?
Both methods work well. For unbaked rolls, freeze assembled slices on a baking sheet, then transfer to a freezer bag. Bake from frozen at 400°F, adding 3-5 extra minutes. Already-baked rolls reheat from frozen at 350°F for 10-12 minutes.
- → What's the best way to prevent soggy bottoms?
Ensure your ground beef is well-drained after cooking to remove excess moisture. Also, don't overload the sauce—keep it within the recommended 1/2 cup. Using parchment paper helps promote even baking and prevents sticking.
- → Can I make these dairy-free?
The dough relies heavily on Greek yogurt for structure and moisture. While you could experiment with dairy-free yogurt alternatives, results may vary significantly in texture. For a dairy-free version, consider a traditional pizza dough recipe instead.
- → How do I get clean slices when cutting the log?
Use a sharp knife and wipe it clean between cuts with a damp paper towel. For even easier slicing, chill the rolled log in the refrigerator for 15-20 minutes before cutting—this firms the dough and helps maintain neat edges.