 Save
Save Last spring, my niece called to ask if I could make something special for her graduation party, and honestly, I froze. Then she mentioned wanting something unique that looked fancy but wouldn't stress me out in the kitchen. That's when these graduation cookies came to mind, and I spent an afternoon discovering that fondant mortarboards were actually way easier than they seemed. The best part? Watching her face when she saw them arranged on the dessert table, each one looking like a tiny celebration of everything she'd worked toward.
My friend Jessica brought her son over the day before his graduation, and he helped me cut out the cookie shapes while we played music a little too loud. He picked square cookies instead of rounds because he said it made them look more official, and honestly, he was right. By the time we finished decorating, he was already planning to bring extras to his dorm room because he wanted his new roommate's first impression of home to involve his mom's baking.
Ingredients
- All-purpose flour (2 1/2 cups): This is your foundation, and I learned the hard way that spooning it into the measuring cup instead of scooping gives you better proportions and fewer dense cookies.
- Unsalted butter (1 cup, softened): Room temperature is non-negotiable here because cold butter won't cream properly with the sugar, and you'll end up with grainy dough.
- Granulated sugar (1 cup): The sweetness balances the fondant perfectly, and the granules help create that light, fluffy texture when creamed with butter.
- Large egg (1): This binds everything together and adds richness; make sure it's at room temperature so it incorporates smoothly.
- Pure vanilla extract (2 teaspoons): Don't skimp on the quality here because it's the secret note that makes people ask what's different about your cookies.
- Baking powder (1/2 teaspoon): A gentle lift, not an explosion, which is exactly what a delicate cookie needs.
- Salt (1/2 teaspoon): This enhances the vanilla and prevents the cookies from tasting flat.
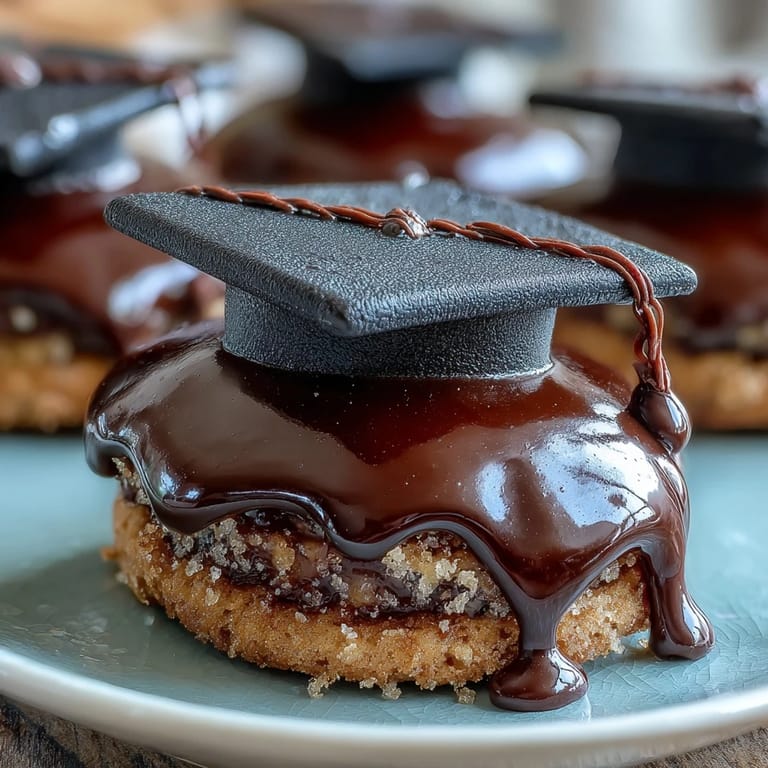
- Black fondant (8 oz): The star of the mortarboard, and I always buy the good stuff because cheap fondant tastes waxy and doesn't roll smoothly.
- Yellow fondant (1 oz): For the tassels, though you can swap this for your graduate's school colors for that personal touch.
- Cornstarch (for rolling): Your best friend when working with fondant; powdered sugar makes it sticky, but cornstarch keeps everything gliding smoothly.
- Powdered sugar (1 cup): Mixed with milk and vanilla, this becomes your edible glue for attaching all the fondant pieces.
- Milk (1-2 tablespoons): Adjusting the milk content lets you control how thick or thin your icing is depending on whether you need it to grip or flow.
Tired of Takeout? 🥡
Get 10 meals you can make faster than delivery arrives. Seriously.
One email. No spam. Unsubscribe anytime.
Instructions
- Prepare your workspace:
- Preheat your oven to 350°F and line two baking sheets with parchment paper while you gather everything else. This takes two minutes but saves you from frantic scrambling later.
- Build the dry mixture:
- Whisk flour, baking powder, and salt together in a medium bowl, which aerates the flour and distributes the leavening evenly. I always whisk for about 30 seconds to make sure there are no little flour pockets hiding in the corners.
- Cream butter and sugar:
- Beat softened butter and sugar in a large bowl for 2 to 3 minutes until it looks pale and fluffy, almost like clouds. You'll hear the mixer working hard, and you'll see the mixture transform from grainy to smooth.
- Bring in the egg:
- Add the egg and vanilla extract and beat until everything is completely incorporated, which usually takes about 1 minute. Scrape down the bowl halfway through so nothing gets left behind clinging to the sides.
- Combine wet and dry:
- Gradually add your dry ingredients to the wet mixture, mixing on low speed just until you see no flour streaks. Overmixing develops gluten and makes cookies tough, so stop as soon as everything looks combined.
- Roll and cut:
- Place dough on a lightly floured surface and roll to 1/4-inch thickness, then cut out 24 rounds or squares about 2 1/2 inches across. The dough should be cold and pliable, not sticky, so refrigerate it for 10 minutes if it fights you.
- Bake until golden:
- Spread cookies on your prepared baking sheets and bake for 10 to 12 minutes until the edges turn just golden but the centers still look slightly underbaked. They continue cooking on the pan after you pull them out, and this residual heat gives you that perfect texture.
- Cool completely:
- Move cookies to a wire rack and let them rest for at least 30 minutes because decorating warm cookies causes the fondant to melt. I usually walk away and work on the fondant pieces while they cool.
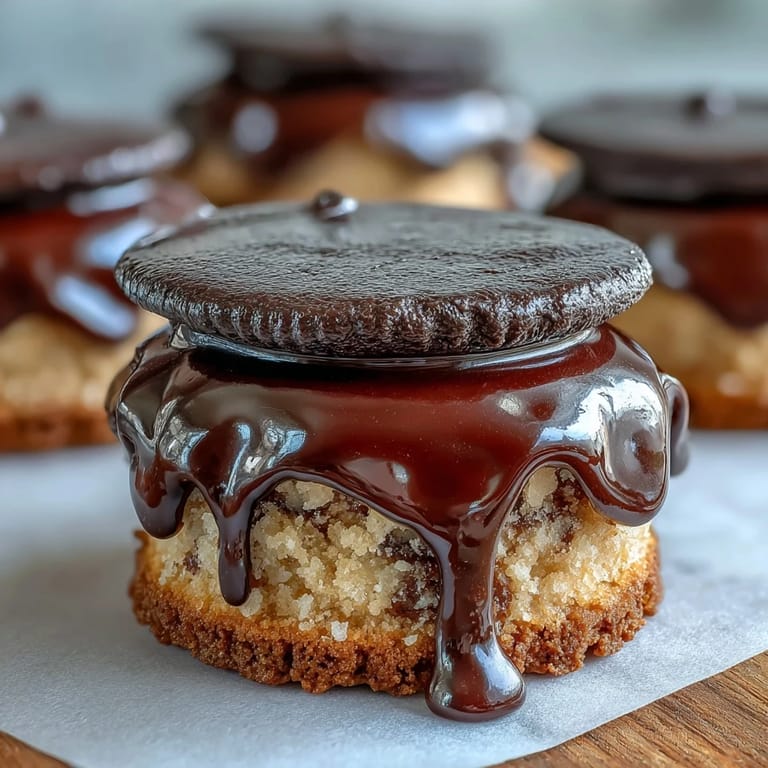
- Prepare the fondant:
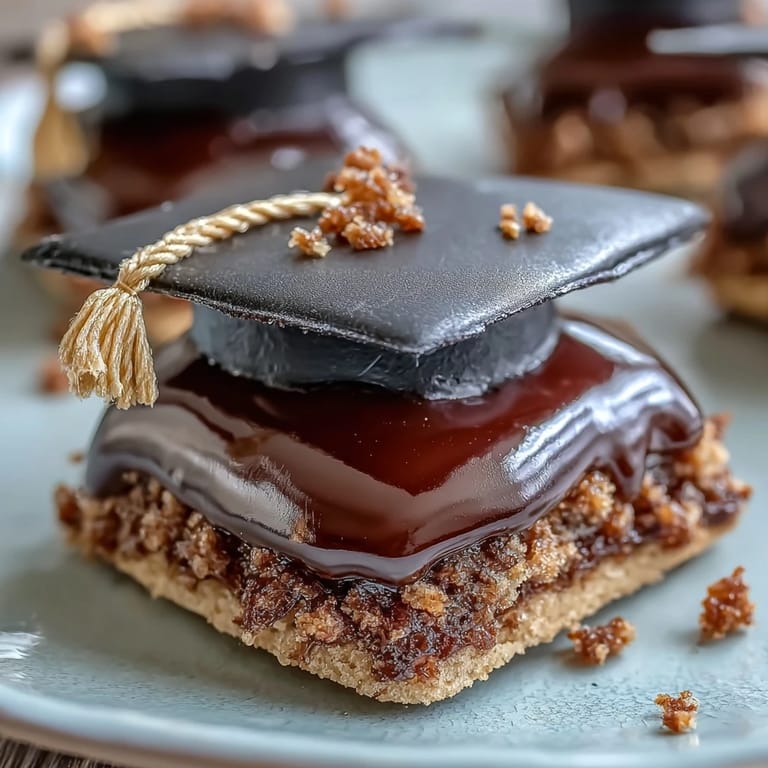
- Dust your work surface with cornstarch and roll black fondant to 1/8-inch thickness, then cut 24 squares about 1 1/4 inches across for mortarboard tops. Roll 24 small cylinders about 1/2-inch long for the board bases, which takes just a few minutes of gentle shaping.
- Create the tassels:
- Roll yellow fondant into thin ropes and cut into 1-inch pieces, then shape them into little tassel-like pieces however you like. These don't need to be perfect because graduation tassels are charmingly imperfect anyway.
- Make the icing glue:
- Mix powdered sugar with 1 to 2 tablespoons of milk and 1/2 teaspoon vanilla until it's smooth but not runny. You want it thick enough to hold things in place but spreadable enough to work with easily.
- Decorate each cookie:
- Use a small dab of icing to attach a fondant square to the center of each cooled cookie, then place a fondant cylinder underneath as the base. Add a tiny bit of icing to one corner of the square and attach your yellow tassel.
- Let everything set:
- Leave the decorated cookies untouched for 20 to 30 minutes so the fondant and icing can firm up properly. This patience prevents your carefully placed mortarboards from sliding around.
 Save
Save Two weeks after the graduation party, my niece texted me a photo of herself holding one of the cookies next to her diploma, and I realized these weren't just desserts anymore, they were little edible memories of a milestone moment. That's the magic of making something handmade for someone you care about.
Customizing Your Cookies
The beauty of this recipe is how easily it adapts to whoever you're celebrating. You can match the fondant colors to your graduate's school colors, their favorite colors, or even their sports team, turning each cookie into a personalized statement. I've made these with purple and gold, navy and white, and even rainbow tassels for a friend who wanted something more playful than traditional graduation vibes.
Making Ahead and Storing
The sugar cookies bake beautifully a full day or two before you decorate them, which is perfect if you're making 24 and want to spread the work out. The decorated cookies stay fresh in an airtight container for up to 5 days, though they taste best within the first 48 hours when the fondant still has that perfect chew and the cookie underneath hasn't started to firm up too much.
Shortcuts That Actually Work
If life gets chaotic before the celebration, I won't judge you for using store-bought sugar cookie dough, and honestly, most people can't tell the difference. Pre-colored fondant also saves you from the process of kneading food coloring into white fondant, which can stain your hands and your counter.
- Store-bought dough bakes just as beautifully as homemade and tastes almost identical once you decorate it.
- Pre-colored fondant means zero messy hands and zero risk of the colors coming out uneven.
- Buying extra fondant in your school colors at the start means you have backup in case you need to redo a mortarboard.
 Save
Save These cookies have become my go-to celebration project, and every time I make them, I think about all the graduates out there marking a moment that matters. Baking these feels like being part of their next chapter.
Cooking Questions & Answers
- → What type of flour is best for these cookies?
All-purpose flour provides the ideal texture for tender, yet sturdy sugar cookies.
- → How do I prevent the fondant from sticking while rolling?
Dust your surface and rolling pin lightly with cornstarch to keep the fondant from sticking.
- → Can I prepare the cookie dough ahead of time?
Yes, chilling the dough for an hour before rolling helps improve texture and handling.
- → What is the best way to attach the fondant decorations?
Use a simple icing made from powdered sugar and milk to glue fondant pieces securely onto the cookies.
- → How should the cookies be stored after decorating?
Place decorated cookies in an airtight container at room temperature for up to 5 days to maintain freshness.