 Save
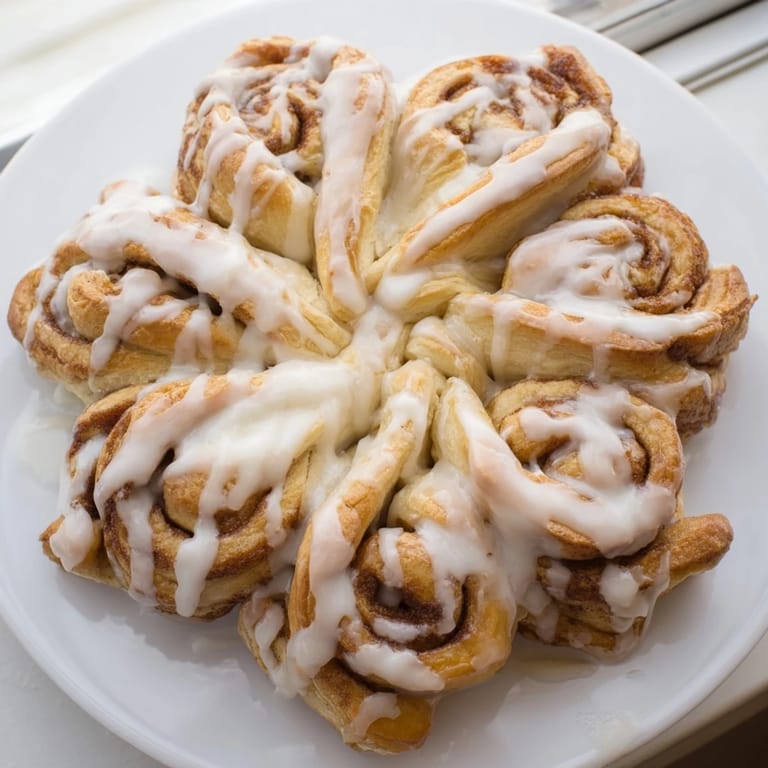
Save My sister texted me a photo of a cinnamon roll pull-apart snowflake she'd seen on her feed, and I remember thinking it was the kind of thing that looked impossible until you realized it was just clever folding. I made one on a cold December morning while the kitchen was still quiet, and the moment I pulled those twisted strips apart, the whole thing fell into this perfect snowflake shape. It felt like edible geometry. Now every winter gathering has one on the table, and people always seem surprised that something this beautiful is meant to be torn apart with your hands.
I brought one to a holiday potluck once, and the host set it out on the table still warm from my car. Within five minutes, people started gathering around it, and before I could even grab a plate, someone was already pulling off a piece and offering bites to their neighbor. That's when I knew this wasn't just a recipe—it was a conversation starter.
Ingredients
- All-purpose flour (3 1/4 cups): The backbone of your dough; this amount gives you structure without being dense.
- Active dry yeast (2 1/4 tsp): Don't skip the frothy proof step—it's your sign that the yeast is alive and ready to work.
- Warm milk (3/4 cup): Temperature matters here; too hot kills the yeast, too cold and it won't activate, so aim for around 110°F.
- Unsalted butter (1/4 cup melted, plus 1/4 cup softened): The melted butter goes in the dough for richness; the softened butter is your filling base.
- Egg (1 large, room temperature): This adds tenderness and helps bind everything together.
- Granulated sugar (1/4 cup) and packed brown sugar (1/2 cup): The granulated sugar feeds the yeast; the brown sugar in the filling gives you that deep caramel sweetness.
- Ground cinnamon (2 tsp): Don't be shy with this—cinnamon is what makes the whole thing sing.
- Powdered sugar (1 cup) and vanilla extract (1/2 tsp): These come together for an icing that drizzles beautifully and tastes like comfort.
Tired of Takeout? 🥡
Get 10 meals you can make faster than delivery arrives. Seriously.
One email. No spam. Unsubscribe anytime.
Instructions
- Wake up your yeast:
- Combine warm milk, granulated sugar, and yeast in a large bowl and let it sit for 5–10 minutes. You'll see it get foamy and bubbly—that's the sign you're ready to move forward.
- Bring the dough together:
- Add melted butter, egg, and salt to your yeast mixture, then gradually stir in flour until a shaggy dough forms. Don't overwork it at this stage; you're just bringing everything into one mass.
- Knead until smooth:
- Turn the dough onto a lightly floured surface and knead for 5–7 minutes until it feels smooth and elastic, like a soft earlobe. Place it in a greased bowl, cover it, and let it rise in a warm corner of your kitchen for about 1 hour until it doubles in size.
- Prep your workspace:
- Preheat your oven to 350°F and line a baking sheet with parchment paper. This is a good moment to make sure your small glass is clean and ready for the center of your snowflake.
- Shape your snowflake base:
- Punch down the dough and divide it into three equal pieces. Roll each piece into a 12-inch circle—don't stress about perfect geometry; rustic circles work fine.
- Build the filling layers:
- Place the first circle on your prepared baking sheet. Mix your softened butter with the cinnamon sugar blend, then spread half of it over this first layer. Lay the second dough circle on top, spread the remaining butter and cinnamon sugar, and top with the third circle.
- Cut your snowflake:
- Place a small glass in the exact center (don't push it through the dough), then use a sharp knife to cut the dough into 16 equal strips radiating out from the glass like spokes on a wheel. You want them even, so marking them lightly with your knife first helps.
- Twist and form:
- Take two adjacent strips and twist them away from each other twice, then pinch the ends together to seal and form a point. Move around the whole snowflake, repeating this with each pair of strips. It's meditative work, and you'll feel the shape come alive as you go.
- Final rise:
- Remove the glass, cover the snowflake with a clean kitchen towel, and let it rest for 15 minutes. This second rise ensures everything stays light and pillowy.
- Bake to golden:
- Bake for 22–25 minutes until the entire snowflake is a warm golden brown. The edges will crisp slightly while the inside stays soft.
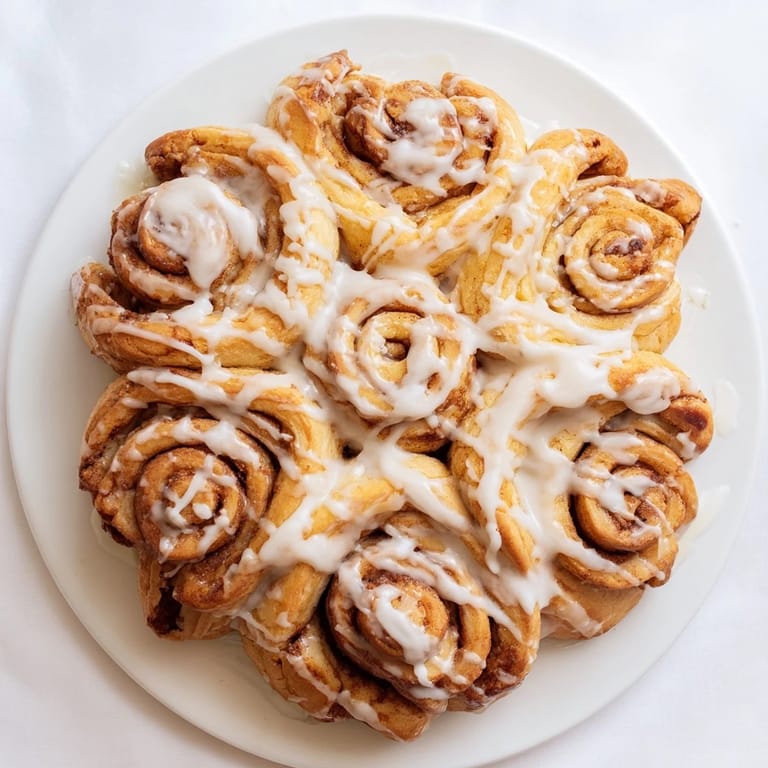
- Finish with icing:
- While the snowflake cools for 10 minutes, whisk together powdered sugar, 2–3 tablespoons of milk, and vanilla extract until you get a drizzle-able consistency. Drizzle it generously over the warm snowflake so it melts into the crevices.
 Save
Save There's something magical about watching people's faces light up when they realize they can just pull this apart with their hands. My nephew once asked if it was okay to tear off the edges first, and I told him there's no wrong way to eat a snowflake. That's the whole point.
The Art of the Twist
The snowflake shape comes from those twisted pairs of dough strips, and getting them right takes a little confidence. Some people are nervous about pulling the dough too hard, but it's actually quite forgiving—yeast dough wants to be stretched and shaped. The twist-twice-and-pinch method locks everything in place so the strips stay attached instead of separating during the bake. If a strip tears, just pinch it back together; it'll seal as everything rises and bakes.
Make It Your Own
This recipe is a starting point, not a rulebook. I've made versions with cream instead of milk for a richer dough, and others where I've stirred chopped toasted pecans or plump raisins into the cinnamon sugar filling. One winter, someone suggested I add a touch of cardamom to the cinnamon, and it changed everything—suddenly it felt Scandinavian and elegant. The point is, once you understand the base, you can drift wherever your kitchen experiments take you.
Pairing and Serving
This snowflake begs for something warm to drink alongside it—hot chocolate if you're feeling cozy, strong coffee if you want balance against the sweetness. I've also served it at dessert time with a small glass of milk, and it works just as well. The icing might seem light, but it matters; it adds just enough sweetness and moisture to make every bite feel complete. Some people eat it right away while it's still warm and the vanilla icing is melting into the crevices, and others prefer it at room temperature the next morning with their coffee.
- Brew a pot of something warm—the contrast between the beverage and the dough is essential to the experience.
- If you're making this ahead, bake it without the icing and store it in an airtight container; warm it gently in the oven and drizzle the icing fresh.
- This keeps for about two days before it starts to dry out, but honestly, it rarely lasts that long.
 Save
Save This snowflake tastes like winter mornings and shared moments. Once you make one, you'll understand why people keep asking for the recipe.
Cooking Questions & Answers
- → How do I shape the cinnamon roll into a snowflake?
After stacking and spreading the dough layers with cinnamon sugar, place a glass in the center and cut 16 strips around it. Twist adjacent strips twice away from each other, pinch the ends to form points, creating the snowflake shape.
- → Can I add nuts or dried fruit to the filling?
Yes, chopped toasted pecans or raisins can be mixed into the cinnamon sugar filling for added texture and flavor.
- → What is the best way to ensure the dough rises properly?
Use warm milk and active dry yeast, let the mixture become frothy before adding flour, then allow the dough to rise in a warm, draft-free area until doubled in size.
- → Can I substitute the milk with another ingredient?
For a richer dough, half of the milk can be replaced with heavy cream to add extra softness and flavor.
- → How should the cinnamon roll snowflake be served?
Cool slightly after baking, drizzle with vanilla icing, then serve warm in pull-apart style, perfect for sharing during winter or celebrations.