 Save
Save My neighbor brought over a bag of candy apples last fall, and I bit into one expecting the usual sticky mess on a stick—instead, the apple stayed crisp, the caramel snapped between my teeth, and dark chocolate shards melted on my tongue all at once. I spent the next twenty minutes pestering her for the secret, which turned out to be this deceptively simple approach: slicing the apples into wedges so you get that perfect ratio of fruit to coating in every single bite. Now whenever I need something that feels indulgent but takes barely half an hour, these show up in my kitchen.
Last winter, my daughter's class had a potluck and I was frantically searching for something that wasn't a cookie or a brownies—something that felt special but wouldn't fall apart in a lunchbox. I made these candy apple slices Friday night, and by Saturday morning they'd somehow vanished from the cooling rack. My husband sheepishly admitted he'd eaten four pieces standing at the kitchen counter, completely unaware he was doing it.
Ingredients
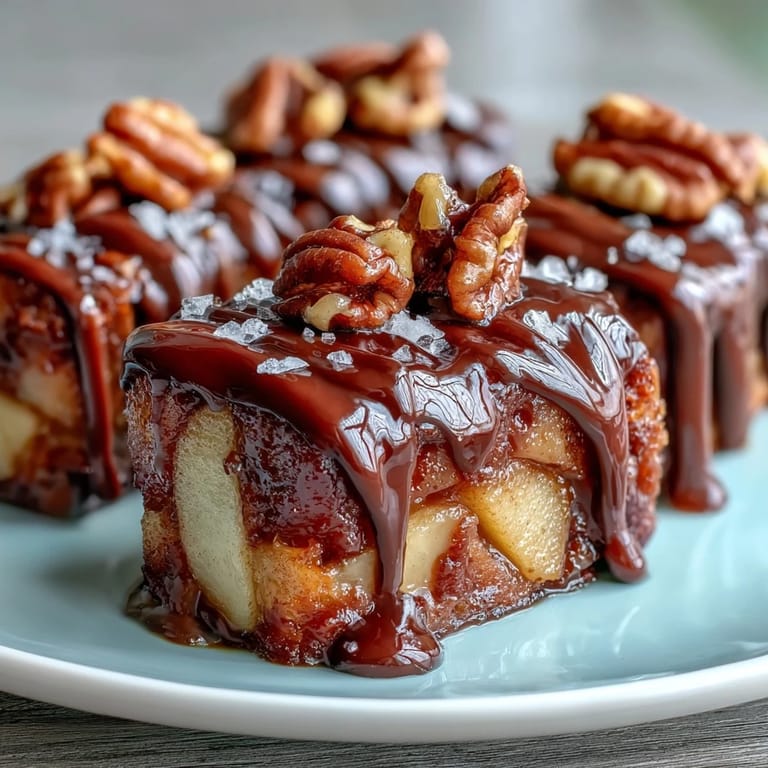
- Crisp apples (2 large, Granny Smith or Honeycrisp): The variety matters more than you'd think—Granny Smiths give you tang to cut through sweetness, while Honeycrisps offer more natural juice that plays beautifully with the caramel.
- Lemon juice (1 tablespoon): This keeps your apple slices from browning while you work, and it's honestly one of those kitchen moves that feels like magic when you realize how simple it is.
- Soft caramel candies (1/2 cup, unwrapped): Using candies instead of making caramel from scratch means fewer burnt pans and a silkier texture—I learned this the hard way after scorching my third batch.
- Heavy cream (2 tablespoons): This loosens the caramel so it coats evenly without tearing the apple skin or pooling at the bottom of your slice.
- Dark chocolate (85 g, 60–70% cocoa), chopped: The cocoa percentage here is your friend—anything higher tastes bitter against the sweetness, anything lower and you lose that sophisticated edge.
- Coconut oil or unsalted butter (1 teaspoon): Just enough to keep the chocolate thin and glossy without making it taste greasy; coconut oil is my go-to because it melts faster and sets cleaner.
- Toasted nuts, sprinkles, flaky sea salt (for garnish): These are your chance to personalize—I go salt-forward because it surprises people, but nuts add texture and sprinkles make it feel festive.
Tired of Takeout? 🥡
Get 10 meals you can make faster than delivery arrives. Seriously.
One email. No spam. Unsubscribe anytime.
Instructions
- Set up your station:
- Lay parchment on a baking sheet and keep it nearby because once coating starts, you'll want to work quickly. Toss your apple slices with lemon juice and pat them completely dry—water is the enemy of a good caramel coat, and you'll notice the difference immediately when you start dipping.
- Anchor your apples:
- Push a popsicle stick or sturdy skewer into each wedge so you have something to grip without your fingers sliding into the melted caramel. I learned to do this before the caramel stage after one memorable moment of burnt fingertips and regret.
- Melt the caramel:
- Put those unwrapped candies in a small saucepan with heavy cream over low heat, stirring constantly until you have something smooth and pourable—it should take about three minutes. Let it cool for a couple of minutes so it's warm but not aggressively hot, which is the sweet spot for coating without the apple getting mushy.
- Coat with caramel:
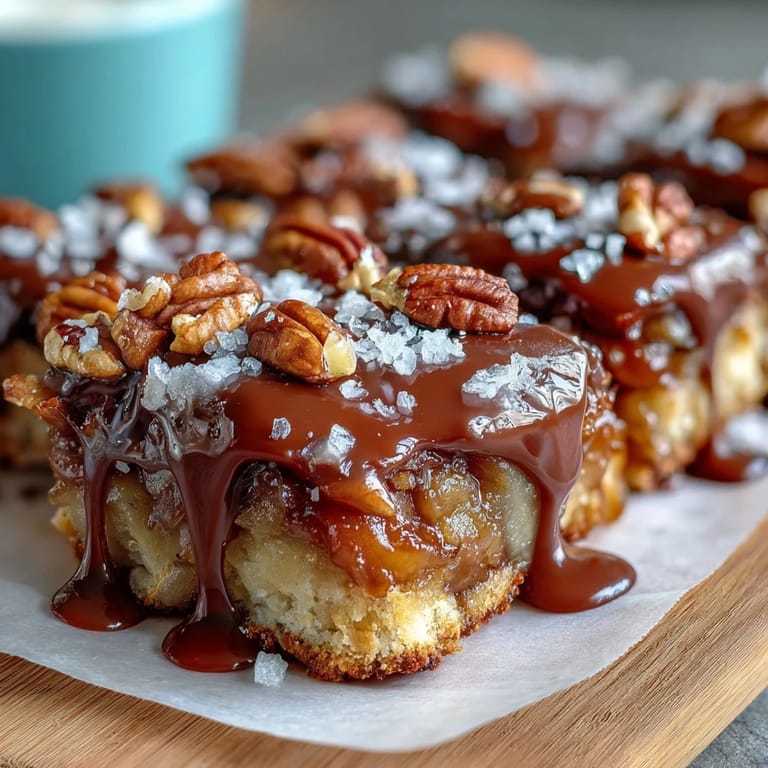
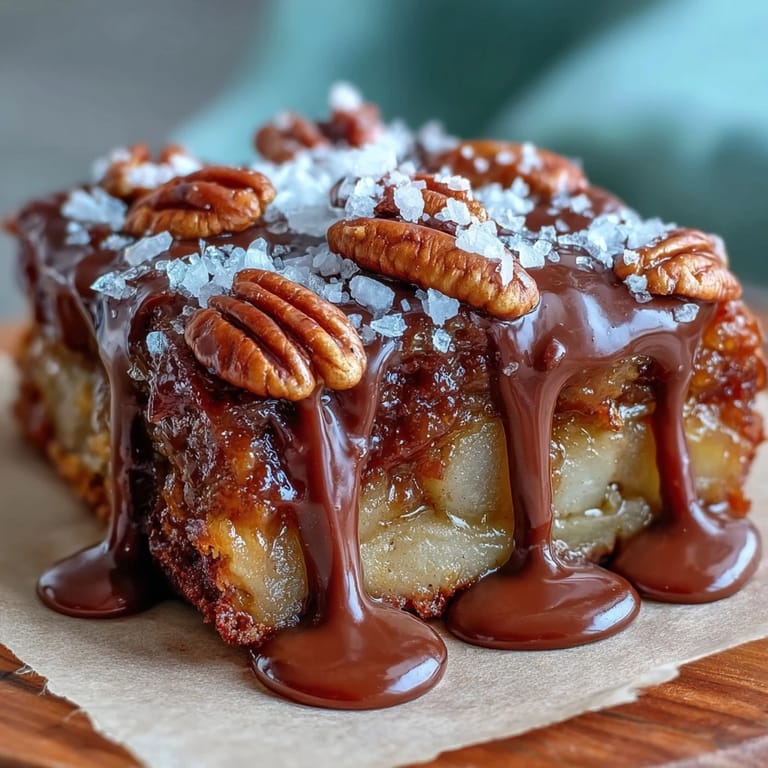
- Hold each apple slice by its stick and dip it halfway into the caramel, letting the excess drip back into the pan for a few seconds. The halfway mark looks elegant and ensures you're tasting apple and caramel together, not just sweetness.
- First chill:
- Line your slices on the prepared baking sheet and slide them into the refrigerator for five minutes—this sets the caramel layer so the chocolate won't mix into it when you drizzle.
- Melt the chocolate:
- Chop your dark chocolate and combine it with coconut oil in a microwave-safe bowl, then heat in twenty-second bursts, stirring between each one so it melts evenly without scorching. This patience pays off when your chocolate looks glossy and feels silky on the spoon instead of grainy and stiff.
- Drizzle and garnish:
- Use a spoon or piping bag to drizzle chocolate over each caramel-coated slice, then immediately hit it with whatever garnish you've chosen—nuts, sprinkles, or a tiny pinch of flaky salt. The "immediately" part matters because once chocolate starts setting, it won't hold toppings as dramatically.
- Final set:
- Back into the refrigerator for another five to ten minutes until the chocolate firms up, then serve cold or at room temperature depending on your mood.
 Save
Save My mother came home from the farmer's market one October afternoon with a bag of apples so beautiful I actually didn't want to cut into them, but these candy apple slices became the reason she now makes them for every gathering. She told me later that watching people bite into something so elegant and simple, then seeing their faces shift to pure contentment, felt like giving them a tiny moment of happiness they weren't expecting.
Texture and Timing
The magic of these slices is that contrasting moment when your teeth hit the crisp apple, then the snap of caramel, then the smooth melt of chocolate—all in one bite. This only works if you nail the timing: apples dipped while fresh, caramel set before chocolate hits it, chocolate set before serving. Rush it and you get a soggy mess; wait too long and everything becomes difficult to bite through, which defeats the entire purpose.
Flavor Combinations Worth Trying
Once you master the basic version, you start seeing possibilities everywhere in your kitchen. I've drizzled white chocolate instead of dark for friends who find 70% cocoa too intense, melted milk chocolate for something sweeter, and even made a version with just caramel and crushed honeycomb candy that tasted like autumn in slice form. The structure stays the same but the experience changes completely depending on what chocolate you choose, which is the kind of kitchen flexibility that keeps recipes from ever feeling repetitive.
Storage and Keeping Fresh
These are best on the day you make them when everything is still crisp and the apple hasn't started surrendering its moisture to the coating. I've tried storing them in the refrigerator overnight and they're still good—the apple softens slightly but the chocolate stays snappy—though by day two the whole thing becomes more of a soft, melty situation. If you're making them for a specific event, assemble them within a couple hours of serving for that texture that makes people close their eyes when they bite in.
- Store any leftovers in an airtight container in the refrigerator and eat them within twenty-four hours for the crispest experience.
- If you're making these ahead, coat the apples with caramel but wait until right before serving to add chocolate and toppings.
- Keep them chilled until the moment you serve so the chocolate stays set and the apple stays as crisp as possible.
 Save
Save There's something about making candy apple slices that feels like you're actually doing something indulgent in your own kitchen instead of buying it from somewhere. When people realize you made these yourself in under thirty minutes, they look at you like you've performed a small miracle.
Cooking Questions & Answers
- → What type of apples work best?
Crisp and tart apples like Granny Smith or Honeycrisp are ideal for a balanced sweet and tangy flavor.
- → How can I prevent apple slices from browning?
Toss apple slices in lemon juice to slow oxidation and keep them looking fresh before dipping.
- → Can I substitute the dark chocolate for another type?
Milk or white chocolate can be used as alternatives for a sweeter and creamier coating.
- → What is the best way to melt caramel candies?
Melt caramel with heavy cream over low heat while stirring to achieve a smooth, dip-ready consistency.
- → Are there allergy considerations to note?
This treat contains dairy and may include nuts if garnished; always check ingredient labels for gluten or other allergens.
- → How long should the coated slices be chilled?
Chill for around 5 to 10 minutes to set the caramel and chocolate layers before serving.